The file manager in your control panel is perfect for quick edits, but when you need to move a whole modpack, a world save, or a big batch of files at once, there is a much better way to do it. SFTP lets you connect a small program on your computer straight to your server and drag files across, and it is far faster than uploading through your browser one file at a time.
This guide takes you through the whole thing from scratch using WinSCP, a free and widely used file transfer program for Windows. SFTP on ServerHeron uses an SSH key rather than a typed password. It is a few extra minutes to set up the first time, but it is more secure, and once it is done connecting takes a single click.
If you are on a Mac, the steps are the same in Cyberduck or FileZilla, and the key setup below is identical.
What you will need
- A Windows PC
- WinSCP, which is free and which we will install in Step 1
- About five minutes of your time for the one-time setup :)
Step 1: Install WinSCP
- Go to the official WinSCP website at winscp.net and download the latest version. Only ever download it from the official site, not from a mirror or an ad link.
- Run the installer and accept the default options. The "Typical installation" is all you need.
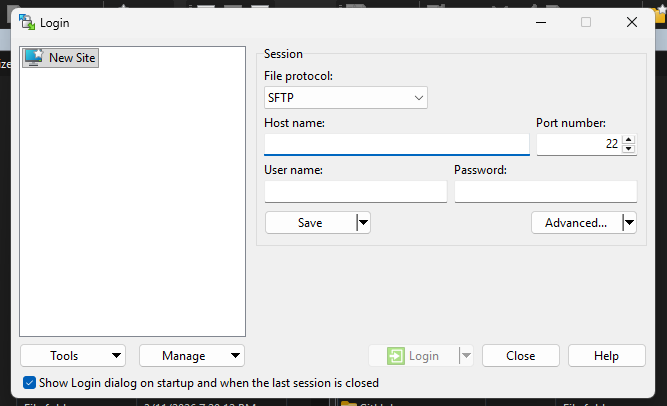
- Open WinSCP when it finishes. A Login window will appear. You can leave it open, we come back to it in Step 4.
Step 2: Create your SSH key
An SSH key is a pair of files: a private key that stays on your computer, and a public key that you hand to your server. WinSCP already includes the tool for making one, called PuTTYgen.
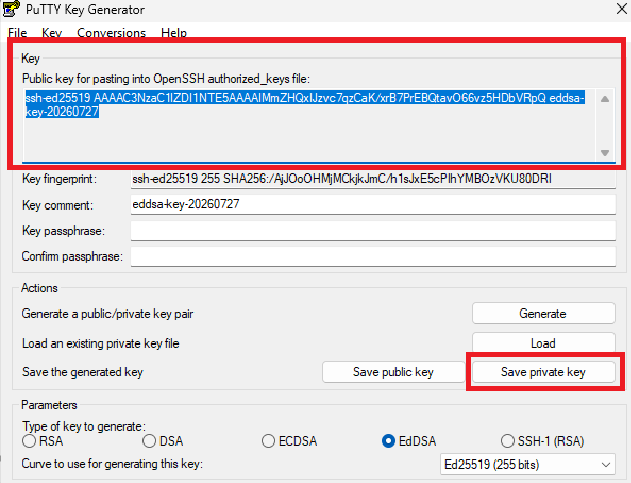
- In WinSCP, open the Tools menu and choose Run PuTTYgen. You can also find PuTTYgen on its own in your Start menu.
- Near the bottom, set the key type to EdDSA. If you do not see EdDSA, leave it on RSA and set the size to 2048 or higher.
- Click Generate, then move your mouse around over the empty area. That random movement is what makes the key secure, so keep going until the progress bar fills.
- When it finishes, a long block of text appears at the top under Public key for pasting into OpenSSH authorized_keys file. Select all of it and copy it or store it somewhere temporarily. You need this in Step 3.
- Click Save private key and save the file somewhere safe and memorable, such as your Documents folder, with a clear name like
serverheron.
A quick note on the passphrase: PuTTYgen offers to set one. It is an optional extra password on the key file itself, so that even someone who copies the file cannot use it. If you set one, you will type it each time you connect. Leaving it blank is perfectly fine for most people, if the passphrase is lost you will need to create a new key.
Step 3: Adding your public key to the panel
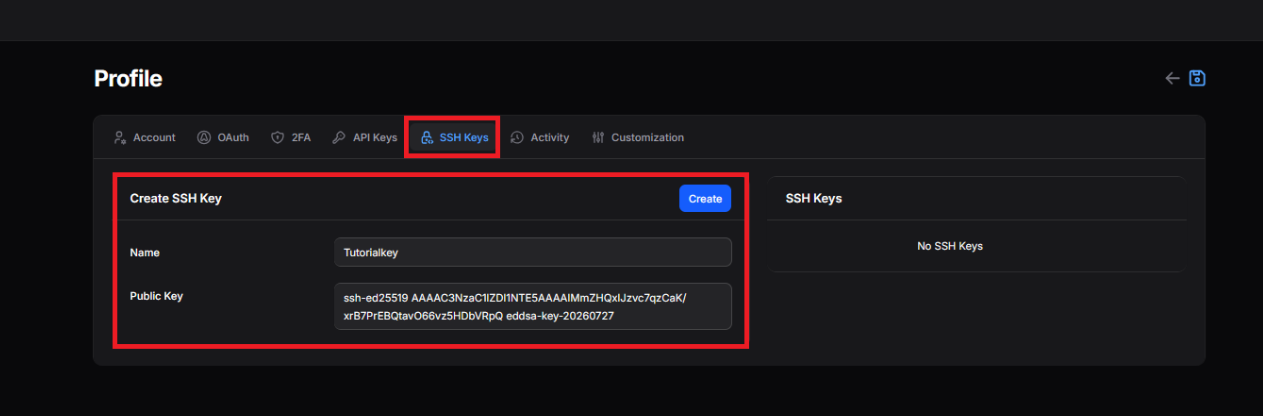
- Log in to your ServerHeron control panel by opening it here or via the 'panel' button at the top of the website.
- In the top right of the screen, click on your profile picture to the right of the notification bell, then select Profile
- On the profile page, navigate to the SSH keys tab
- Give the key a name you will recognise later (this is merely a note), such as the name of your computer. Then, paste the public key you copied in Step 2 in the 'Public Key' section, and save.
The public half is meant to be shared with your server. Your private key never leaves your computer.
Step 4: Connect
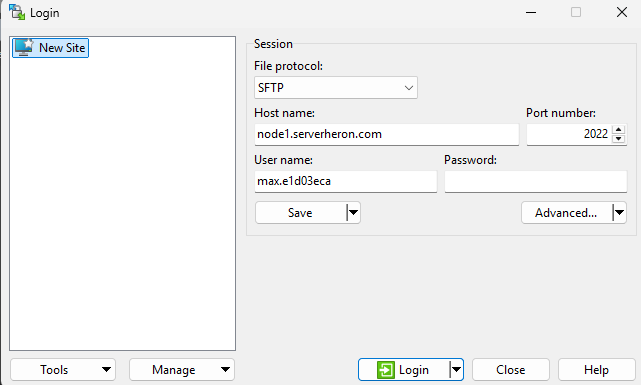
- Open WinSCP. The Login window appears. If it does not, click New Site.
- Set File protocol to SFTP.
- Find the SFTP Information of your server by opening it in the panel, and navigating to Settings, the connection information is shown in the 'SFTP Information' section
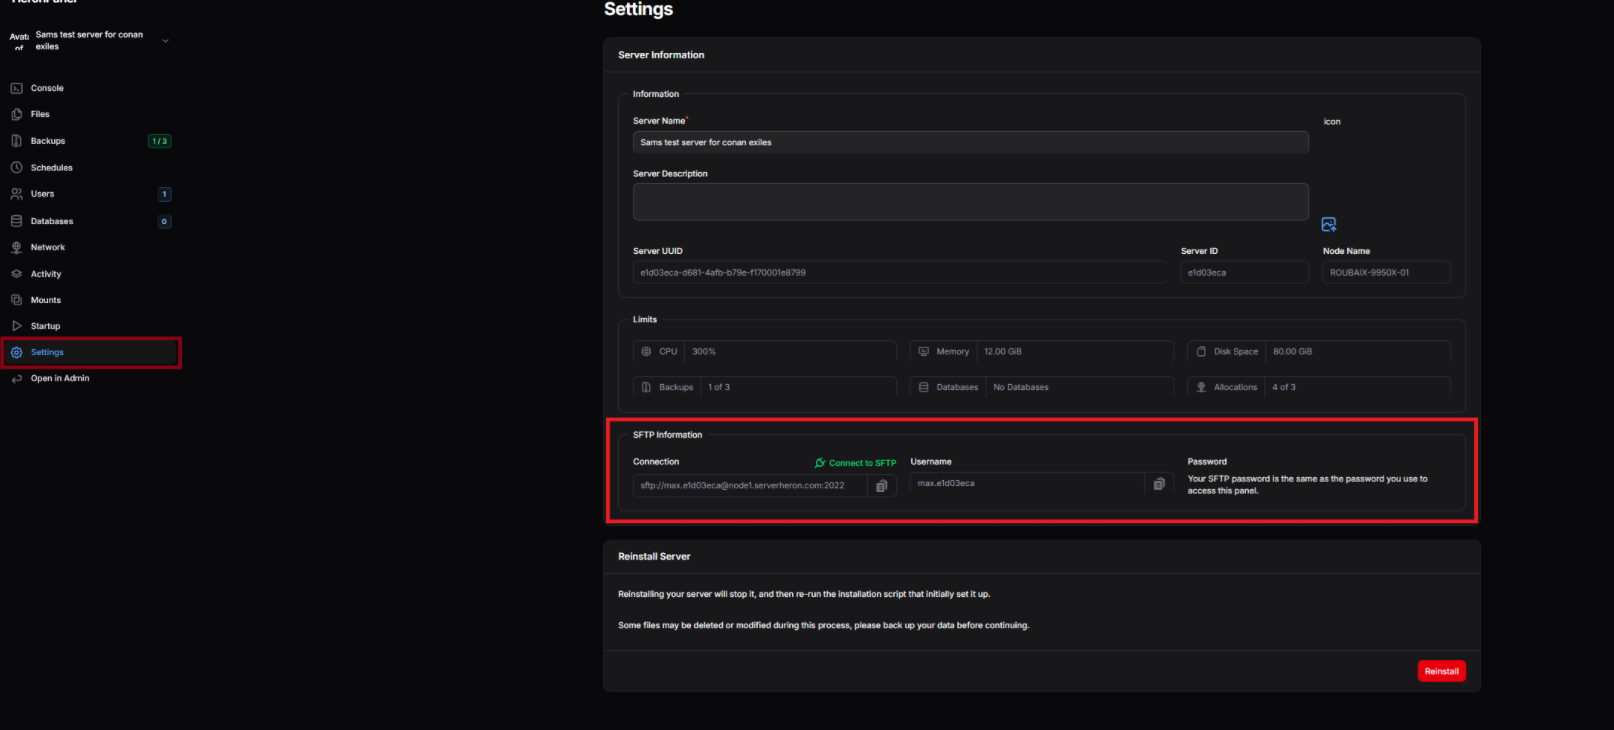
- Copy the information from the Connection line and paste it into 'Host name' section in WinSCP, the port and username should also get filled in automatically.
- Leave the Password box empty.
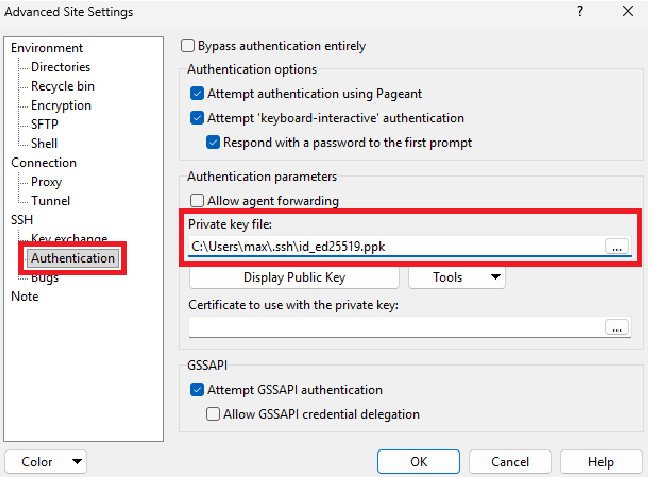
- Click Advanced. In the window that opens, go to SSH, then Authentication. Under Private key file, browse to the private key you saved in Step 2 and click OK. If WinSCP offers to convert the key to its own format, say yes.
- Back on the Login window, click Save so you do not have to set this up again, then click Login.
- The very first time you connect, WinSCP shows the server's fingerprint and asks whether you trust it. This is normal and expected. Click Yes.
You are connected.
Moving your files
WinSCP shows two panels side by side. The left panel is your computer and the right panel is your game server. Find what you want on the left, then drag it across to the right to upload, or drag from right to left to move them from the server to your own computer. You can move whole folders, select many files at once, and let it work through hundreds of them while you get on with something else.
If something goes wrong
"Server refused our key" or "Access denied"
This nearly always comes down to one of three things, in order of how often they happen:
- The public key has not actually been saved on your account yet. Go back to Step 3 and confirm it is listed there.
- The user name is not an exact match. Copy it again from the Username field on the panel, not from the connection link.
- The protocol is set to FTP instead of SFTP, or the port is not the one shown on your panel.
WinSCP asks you for a passphrase
That is the passphrase for the key itself, the optional one from Step 2, and not your account login. If you never set one, leave it blank.
"Connection timed out" or "Connection refused"
Check that the port matches the one on your SFTP panel, usually 2022 rather than the standard 22. If you are on a locked-down office or school network, that port may be blocked, so try again from home or a different network.
WinSCP says the key is not in a supported format
Let it convert when it offers to. If it does not offer, open PuTTYgen, click Load, select your key, and then choose Save private key to produce a .ppk file you can select in WinSCP.
That is it!
Once this is set up, connecting again is a single click from the WinSCP login screen, and moving files is as simple as dragging them across. If you run into anything this guide does not cover, or can't work something out, open a support ticket, or message us directly on discord (usually faster) and we will get you sorted.